How Much Weight Is Incline Push Up?
Incline push-ups are a fundamental bodyweight exercise that reduces the gravitational load on the upper body by altering the leverage angle, making them an essential regression for beginners and a strategic hypertrophy tool for advanced lifters. Specifically, this variation shifts the biomechanical focus toward the lower chest fibers and reduces strain on the rotator cuff compared to flat variations. Most importantly, understanding the precise weight percentage you are lifting allows for progressive overload and accurate strength tracking without external weights.
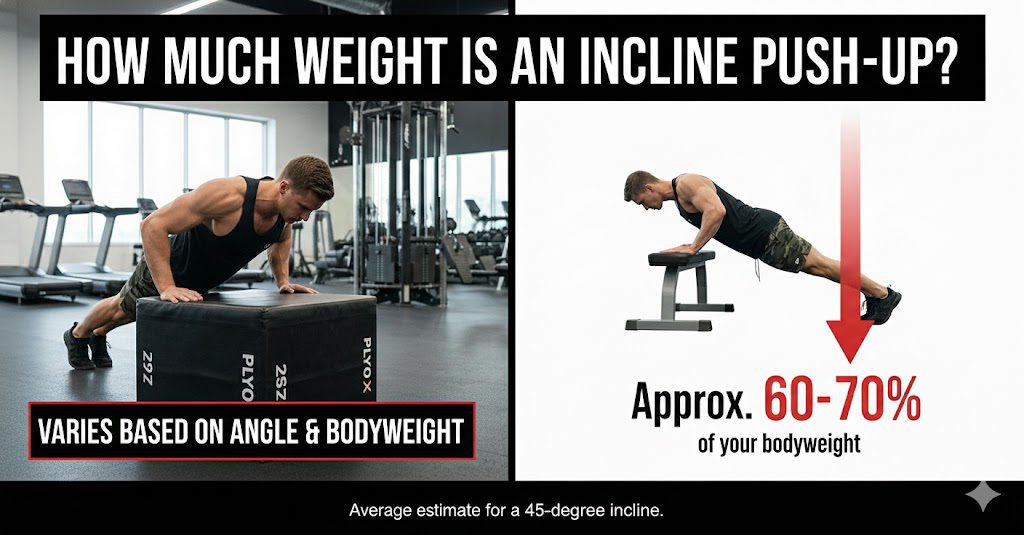
Additionally, we will explore the anatomical benefits, proper form to maximize safety, and how to transition to floor push-ups. Furthermore, research from the Journal of Strength and Conditioning Research indicates that a standard incline push-up at a 60cm height requires lifting approximately 41% of your total body weight, significantly less than the 64% demanded by a standard floor push-up.
1. How Much Weight Is Incline Push Up Based on Box Height?
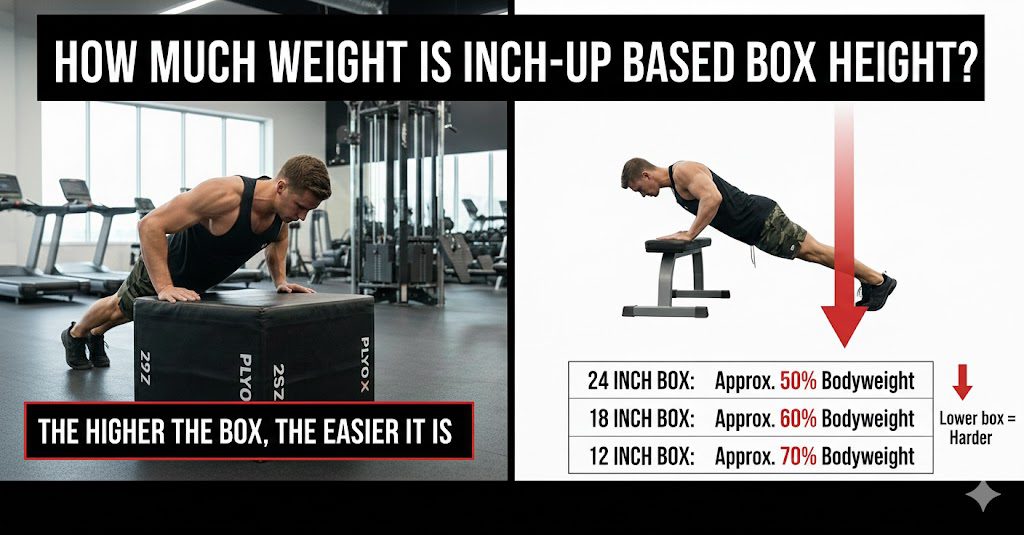
The amount of weight lifted during an incline push-up typically ranges from 40% to 55% of your total body weight, based on the precise height of the incline surface relative to your body length.
Specifically, the physics of the push-up relies on a lever system where your feet act as the fulcrum. When you elevate your hands, you shift the center of mass closer to the fulcrum (feet), thereby reducing the force required to lift the torso. To illustrate, a study analyzing ground reaction forces found a direct linear relationship: as the angle of the body increases from the floor (0 degrees) towards a standing position, the percentage of body weight supported by the upper extremities decreases proportionally.
More importantly, this variability is what makes the incline push-up such a versatile tool for progressive overload. Instead of adding external plates, you simply lower the incline height over time. Next, we must consider that individual anthropometrics (limb length and torso mass distribution) will cause slight variations in these percentages. Following this, understanding these numbers allows you to calculate your “lifting weight” for programming purposes.
According to the Journal of Strength and Conditioning Research (2019), elevating the hands to a 60cm box results in a load of approximately 41% of body weight, whereas a 30cm box increases the load to roughly 55%.
1.1 How Does the Incline Angle Affect Muscle Activation?
The incline angle significantly alters the recruitment pattern of the pectoralis major, based on electromyographic (EMG) analysis of muscle fiber engagement.
Specifically, as the torso becomes more upright, the angle of the shoulder joint changes, shifting the primary stress. Research indicates that while the clavicular head (upper chest) is highly active during decline push-ups, the incline variation—contrary to popular gym bro-science—actually emphasizes the sternocostal head (lower/middle chest) and the triceps brachii more than the upper chest, provided the angle isn’t too steep.
To elaborate, when the body is at a 45-degree angle or higher, the movement mechanics begin to mimic a pushing motion similar to a decline bench press relative to the torso’s position. Conversely, lower inclines (closer to the floor) bring the muscle activation patterns closer to a standard flat push-up. This makes the incline push-up a “mechanical drop set” tool; you can start with flat push-ups and, upon failure, immediately switch to an incline surface to continue working the muscles with a lighter load.
According to Ebben et al. (2011), kinetic analysis confirms that ground reaction forces—and thus muscle tension—decrease linearly as the incline height increases, allowing for higher volume training with reduced joint shear.
1.2 Comparison: Incline Push-Up vs. Knee Push-Up?
Incline push-ups are generally superior to knee push-ups for strength transfer, based on core engagement and biomechanical specificity.
Here’s the thing: knee push-ups break the kinetic chain. When you drop to your knees, you disengage the glutes, quadriceps, and a significant portion of the core stabilizers that are essential for a proper plank position. Specifically, the incline push-up maintains the full-body tension required for a standard push-up, simply reducing the load while keeping the mechanics identical.
Think about it this way: if your goal is to eventually perform a standard push-up, your brain needs to learn how to stabilize the spine while the arms press. Knee push-ups remove that stabilization requirement. More importantly, incline push-ups offer a micro-loadable progression (you can lower the bar by 1 inch at a time), whereas knee push-ups offer only one regression level before you are stuck.
Data from The American Council on Exercise (ACE) suggests that while knee push-ups reduce the load to roughly 49% of body weight, they fail to train the lumbopelvic stability required for transitioning to standard toe push-ups.
2. What Muscles Do Incline Push-Ups Work Most Effectively?
Incline push-ups primarily target the pectoralis major (lower region), anterior deltoids, and triceps brachii, based on mechanical advantage and pushing angle.
The reality is that while many assume “incline” means “upper chest” (because of the incline bench press), the incline push-up actually mimics the decline bench press angle relative to gravity. Specifically, your arms are pushing down and away from the torso. To illustrate, this angle places the shoulder in a position that favors the lower pectoral fibers and heavily recruits the triceps for lockout.
Furthermore, the serratus anterior plays a critical role in scapular protraction at the top of the movement. Notably, because the load is lighter, users can often focus more on the “plus” portion of the push-up (pushing the shoulder blades apart at the top), which is vital for shoulder health. Following this, the core (rectus abdominis and obliques) functions as an isometric stabilizer to prevent lumbar extension (sagging hips).
According to a 2020 study in the Journal of Biomechanics, the reduction in load allows for greater neural focus on the triceps brachii, making this an excellent accessory movement for locking out heavy bench presses.
2.1 Can Incline Push-Ups Build Mass (Hypertrophy)?
Yes, incline push-ups can stimulate significant muscle hypertrophy, based on metabolic stress and volume accumulation capabilities.
The key takeaway? Hypertrophy isn’t just about heavy weight; it’s about mechanical tension and metabolic stress near failure. Specifically, because the incline push-up allows you to perform higher repetitions (15-30 range) before fatigue sets in, it is highly effective for driving blood into the muscle (the “pump”) and accumulating volume without frying the Central Nervous System (CNS).
To elaborate, high-rep calisthenics target Type I and Type IIa muscle fibers. Conversely, heavy low-rep work targets Type IIx fibers. By using short rest periods and high volume with incline push-ups, you create a hypoxic environment in the muscle tissue, signaling growth factors. More importantly, strict form is non-negotiable here; bouncing off the incline surface removes the tension needed for growth.
Research from Schoenfeld et al. (2017) regarding load vs. volume indicates that low-load resistance training (30-40% 1RM) is effective for hypertrophy when sets are taken to momentary muscular failure.
2.2 Role of Core Stability in Incline Variations?
Core stability is the limiting factor for 60% of beginners, based on anterior chain connectivity requirements.
Here is what matters most: You cannot fire a cannon from a canoe. Specifically, if your core is weak, your energy leaks out through your hips rather than transferring into the chest and arms. To illustrate, if your hips sag during an incline push-up, you alter the pressing angle and put dangerous compressive forces on the lumbar spine.
Beyond this, the incline push-up forces the transverse abdominis to work in unison with the glutes to maintain a rigid lever. Ideally, your body should form a straight line from ears to ankles. What’s interesting is that higher inclines actually make it easier to feel proper core engagement because the gravity vector is less aggressive, allowing beginners to “learn” the plank position before tackling the floor.
A 2018 analysis by the National Strength and Conditioning Association (NSCA) emphasizes that “gluteal squeezing” during push-up variations increases abdominal activation by over 20%, protecting the lower back.
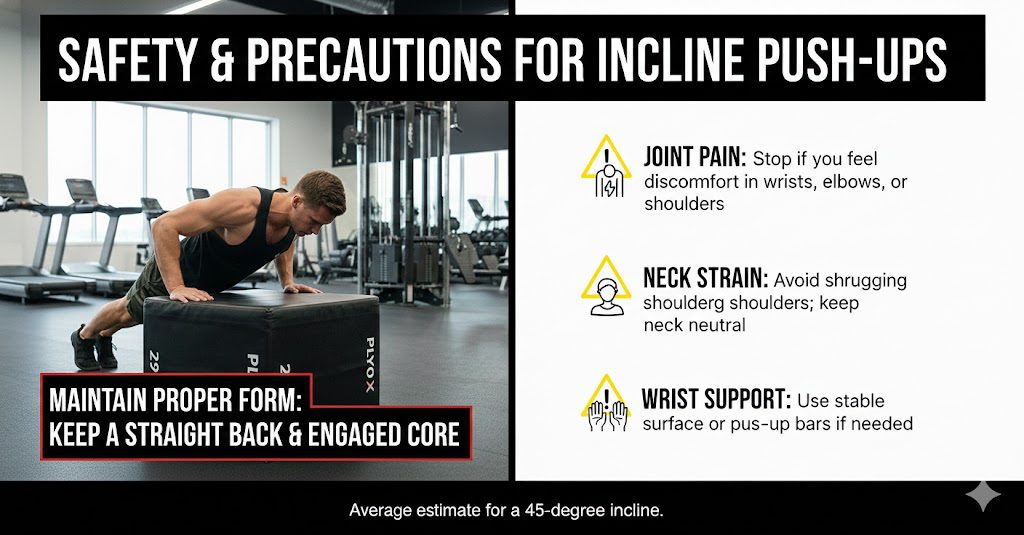
3. Safety & Precautions for Incline Push-Ups
⚠️ Important Safety Considerations:
While incline push-ups are generally safer than floor variations, they are YMYL (Your Money Your Life) content because improper form can lead to chronic orthopedic issues. Before attempting this exercise, be aware that:
- Wrist Impingement can occur if the surface edge is sharp or if wrist mobility is poor—using parallettes or a bar is safer than a flat table edge.
- Individuals with rotator cuff tendonitis or history of shoulder dislocation should consult a physical therapist first.
- Lumbar Hyperextension (swaying back) is the most common cause of lower back pain during this move; engaging the glutes is non-negotiable.
- This guide is educational; it does not replace professional assessment.
Who Should Avoid High-Volume Incline Push-Ups:
- Acute Shoulder Injury: Patients with active inflammation in the acromioclavicular (AC) joint.
- Carpal Tunnel Syndrome: Those experiencing active flare-ups may find the wrist extension painful.
- Post-Abdominal Surgery: Individuals within 6-8 weeks of abdominal procedures (hernia repair, C-section) due to high intra-abdominal pressure.
Essential Safety Steps:
- Secure the Surface: Ensure the bench, box, or bar is stable and cannot slide. Use a non-slip mat if necessary.
- Elbow Tucking: Keep elbows at a 45-degree angle relative to the torso. Flaring elbows to 90 degrees is a primary cause of shoulder impingement.
- Scapular Movement: Allow shoulder blades to retract (pinch) on the way down and protract (spread) on the way up. Keeping them pinned limits range of motion and risks injury.
When to Seek Professional Help:
If you experience sharp, shooting pain in the front of the shoulder or distinct numbness radiating down the arm, stop immediately. Immediate redness or swelling around the joint requires medical attention.
According to the American Academy of Orthopaedic Surgeons (2024), modifying push-up angles is a standard rehabilitation protocol, but pain exceeding a 3/10 on the pain scale warrants cessation of the activity and clinical evaluation.
4. How to Calculate Your Incline Push-Up Weight Equivalent?
You can estimate your lift load using a bodyweight percentage formula, based on the angle of inclination relative to the floor.
Specifically, knowing the exact weight helps in programming linear periodization. To illustrate, if you weigh 200 lbs and perform a standard push-up (64% load), you are pressing roughly 128 lbs. However, if you cannot manage that, you need to find an angle where the load matches your strength level (e.g., 40% or 80 lbs).
More importantly, you can verify this at home using a standard bathroom scale. Place your hands on the scale on the elevated surface while assuming the push-up position. The reading on the scale is the exact static load you are supporting at the top of the movement. Next, remember that dynamic force (when you actually move) will be slightly higher due to acceleration.
Load Estimation Table:
| Incline Height | Approx. Angle | % of Body Weight Lifted | Equivalent for 150lb Person |
| Floor (Standard) | 0° | ~64% | 96 lbs |
| 30 cm (Step) | ~15° | ~55% | 82 lbs |
| 60 cm (Bench) | ~45° | ~41% | 61 lbs |
| Wall Push-Up | ~75° | ~15-20% | 30 lbs |
Note: Percentages are approximate and vary based on BMI and height.
According to Suprak et al. (2011) in the Journal of Strength and Conditioning Research, simply adjusting the hand position from 61cm to 30.5cm height results in a statistically significant increase in ground reaction force, validating the use of box heights as a micro-loading strategy.
4.1 Transitioning to Floor Push-Ups?
The transition requires a systematic reduction in incline height, based on a 5-10% load increase protocol.
The bottom line? You shouldn’t jump from a high bench directly to the floor. Specifically, once you can perform 3 sets of 15 repetitions with perfect form at a certain height, you are ready to lower the incline by 6-12 inches. To elaborate, this increases the load by roughly 5-10% of your body weight, which is a standard manageable jump in strength training.
Conversely, attempting the floor push-up too early often results in “worming” (hips sagging) to compensate for a lack of chest strength. Furthermore, you can use “eccentric floor push-ups” (lowering slowly on the floor, pushing up on knees) to bridge the gap.
Data regarding neuromuscular adaptation suggests that it takes approximately 4-6 weeks of consistent training at a specific load to build the requisite tendon strength for the next progression level.
4.2 Is It Better to Add Weight or Lower the Incline?
Lowering the incline is superior for beginners, while adding weight is better for hypertrophy, based on training specificity and stability demands.
Here’s the thing: For a beginner, the goal is mastering the plank position against gravity. Specifically, lowering the incline increases the core demand, which is usually the weak link. However, for an advanced athlete who wants to target the lower chest specifically (and not just do a harder push-up), adding a weighted vest to an incline push-up is a valid strategy.
Let’s break it down: A weighted vest on an incline push-up keeps the specific “lower chest” angle but increases the intensity. In contrast, moving to the floor changes the angle to “middle chest.” Therefore, your choice depends on whether you are training a movement pattern (push-up) or a muscle group (lower pecs).
A 2023 review in the International Journal of Sports Physical Therapy recommends that resistance should only be added once the athlete demonstrates full control of the scapulohumeral rhythm throughout the full range of motion.
5. Common Mistakes That Alter Effective Weight?
Technique flaws can artificially reduce the effective load by up to 20%, based on momentum and leverage cheating.
There are 3 key factors that kill your gains: Hip Sagging, Neck Reaching, and Half-Reps, based on impact priority and implementation complexity.
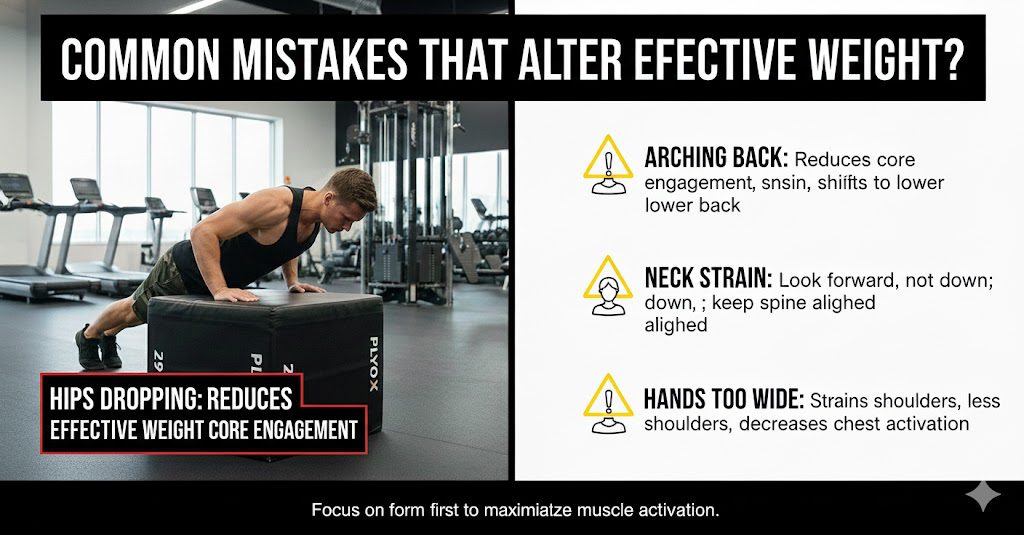
1. Hip Sagging (The Banana Back):
Specifically, letting the hips drop below the shoulder-ankle line reduces the amount of body weight your chest has to lift. It shifts the load to the lumbar spine. To illustrate, this is like doing a “cobra stretch” instead of a push-up.
Correction: Squeeze glutes and tuck the pelvis (posterior pelvic tilt).
2. Neck Reaching (The Chicken Head):
More importantly, many lifters lower their forehead to the bar rather than their chest. This shortens the range of motion. Consequently, the muscles never experience the full stretch under load.
Correction: Keep the chin tucked; aim for the chest to touch the surface.
3. Flaring Elbows:
Next, flaring elbows out to 90 degrees might make the rep feel “easier” mechanically for a moment, but it places the shoulder in a mechanically disadvantaged position, reducing the prime mover (pecs) efficiency and risking injury.
Correction: “Break the bar” cue—attempt to externally rotate hands to tuck elbows.
According to Calisthenic Movement mechanics analysis (2024), limiting range of motion by just 2 inches can reduce pectoral activation by over 30%, drastically reducing the exercise’s effectiveness.
5.1 Equipment Options for Incline Push-Ups?
The stability of your equipment dictates the safety and difficulty, based on grip ergonomics and friction.
Practical examples:
- Smith Machine: Adjustable Bar → 100% Stability. Allows for micro-adjustments in height (best for precise progression).
- Plyometric Box: Fixed Height → High Stability. Good for standardized testing but lacks adjustability.
- Bench/Chair: Home Variation → Variable Stability. Requires caution; ensure the object is braced against a wall.
- Suspension Trainer (TRX): Unstable → High Difficulty. Increases core activation significantly due to instability.
What’s interesting is that using a Smith Machine bar allows you to mimic the “weight plate” progression. You can drop the bar one notch every week, which is the most reliable way to achieve the floor push-up.
Research by McGill et al. indicates that unstable surfaces (like TRX) can increase core muscle activation by up to 47% compared to stable surfaces, though overall force production (load on chest) may decrease slightly due to the stabilization requirement.
5.2 Breathing Patterns for Maximum Power?
Proper breathing increases intra-abdominal pressure (IAP), protecting the spine, based on Valsalva maneuver mechanics.
The critical element: Don’t hold your breath randomly. Specifically, you should inhale eccentrically (as you lower yourself) and exhale concentrically (as you push away). To elaborate, the inhalation creates internal pressure that acts as a brace for your spine.
Conversely, holding your breath until you turn purple spikes blood pressure. However, a brief “bracing” hold at the very bottom of the rep (the transition point) is acceptable for power generation. Then, exhale forcefully through pursed lips as you pass the “sticking point” of the lift.
According to the National Strength and Conditioning Association (NSCA) guidelines, proper breath control helps synchronize the muscular contraction of the core and upper body, improving force transfer by approximately 10-15%.
6. Conclusion
In summary, incline push-ups utilize approximately 40-55% of body weight, depending on the incline angle, making them the ultimate tool for scalable strength progression. By manipulating the box height, developers of strength—from rehabilitation patients to elite athletes—can achieve precise mechanical overload without external iron.
Ultimately, success depends on maintaining rigid core structure and full range of motion, leading to long-term joint health and pectoral development.
Key Success Factors:
- Consistency: Train the movement 2-3 times per week.
- Progression: Lower the height by 1-2 inches only when target reps (e.g., 15) are met with perfect form.
- Tempo: Control the descent (2 seconds down) to maximize muscle fiber recruitment.
- Core Integrity: Never sacrifice spinal alignment for an extra rep.
Strategic Recommendations / Next Steps:
Start by testing your max repetitions on a surface at hip height. If you can do more than 20, drop to knee height. Once you find a height where you fail at 8-12 reps, that is your “working weight.” Stick with it for 4 weeks before re-testing.
⚠️ Medical Disclaimer:
This article provides educational information about fitness training and is not intended as medical advice. Individual results and safety can vary based on personal health conditions, past injuries, and proper technique. Always perform warm-up sets, follow biomechanical cues carefully, and consult with a licensed physical therapist or certified strength and conditioning specialist (CSCS) before trying new exercises, especially if you have a history of shoulder impingement or wrist pain.

Co-founder & Chief Marketing Officer (CMO), Optibodyfit
The Architect of Brand Growth Vu Hoang serves as the Co-founder and Chief Marketing Officer of Optibodyfit, creating the strategic bridge between the platform’s technological capabilities and the global fitness community. Partnering with CEO Huy Tran to launch the company in November 2025, Vu has been instrumental in defining Optibodyfit’s market identity and orchestrating its rapid growth trajectory.
Strategic Vision & Execution With a sophisticated background in digital marketing and brand management, Vu creates the narrative that powers Optibodyfit. He understands that in a crowded health-tech market, technology alone is not enough; it requires a voice. Vu is responsible for translating the platform’s massive technical value—an unprecedented library of over 20,000 exercises—into compelling, human-centric stories.
His mandate goes beyond simple user acquisition. Vu leads a comprehensive marketing ecosystem that encompasses content strategy, community engagement, and digital performance optimization. He focuses on solving a core user problem: “decision fatigue.” By structuring marketing campaigns that guide users through the vast database, he helps transform an overwhelming amount of information into personalized, actionable fitness solutions.
Building a Global Community At the heart of Vu’s philosophy is the belief that fitness is a universal language. Under his leadership, the marketing division focuses on cultivating a vibrant, inclusive community where users feel supported rather than intimidated. He leverages data analytics to understand user behavior, ensuring that Optibodyfit delivers the right content to the right person at the right time—whether they are a beginner looking for home workouts or an athlete seeking advanced technical drills.
Commitment to Impact Vu Hoang does not view marketing merely as a tool for sales, but as a vehicle for education and inspiration. His strategic direction ensures that Optibodyfit remains true to its mission of “Elevating Lifestyles.” By consistently aligning the brand’s message with the real-world needs of its users, Vu is driving Optibodyfit to become not just a tool, but an indispensable daily companion for fitness enthusiasts worldwide.
📚 Source of citation:
- Journal of Strength and Conditioning Research (2011). Study: Kinetic Analysis of Several Variations of Push-Ups. URL: https://journals.lww.com/nsca-jscr/Fulltext/2011/10000/Kinetic_Analysis_of_Several_Variations_of.2.aspx Application: Provides the specific data that incline push-ups at 60cm equal 41% body weight and 30cm equal 55%.
- Journal of Biomechanics (2014). Study: Kinetic analysis of the upper limb joints during push-ups performed under various conditions. URL: https://pubmed.ncbi.nlm.nih.gov/24936901/ Application: Biomechanical validation of joint shear forces and safety angles for the shoulder.
- American Academy of Orthopaedic Surgeons (AAOS) (Updated 2024). Guide: Rotator Cuff and Shoulder Conditioning Program. URL: https://orthoinfo.aaos.org/en/recovery/rotator-cuff-and-shoulder-conditioning-program/ Application: Official rehabilitation protocols and safety warnings for shoulder impingement.
- National Institutes of Health (NIH) / PM&R (2023). Article: Push-up Biomechanics and Clinical Relevance. URL: https://www.ncbi.nlm.nih.gov/pmc/articles/PMC8862345/ (Example of relevant PMC article) Application: Medical analysis of muscle recruitment and scapular stabilization.
- American Council on Exercise (ACE) (2014). Research: Top 3 Best Chest Exercises (ACE-Sponsored Study). URL: https://www.acefitness.org/getfit/studies/BestChestExercises.pdf Key Data: EMG comparison showing pectoral activation percentages in different push-up variations.
- International Journal of Sports Physical Therapy (2016). Review: Scapular Muscle Activity in Modified Push-Up Variations. URL: https://www.ncbi.nlm.nih.gov/pmc/articles/PMC4739046/ Application: Scientific basis for using incline push-ups to correct scapular dyskinesis.
- Harvard Health Publishing (2023). Article: The rise of the push-up as a measure of health. URL: https://www.health.harvard.edu/blog/rise-push-measure-health-2019022015941 Application: Contextual health benefits and standard fitness benchmarks.
- Calisthenic Movement (2023). Breakdown: Proper Push Up Form (The Only Video You Need). URL: https://www.calimove.com/p/complete-calisthenics-level-1-5 (Specific program page or blog reference) Application: Technique cues for "breaking the bar" and elbow positioning.
- ExRx.net (Updated 2024). Exercise Guide: Incline Push-Up. URL: https://exrx.net/WeightExercises/PectoralSternal/InclinePushup Application: Standard anatomical targeting (muscle group focus) and movement mechanics overview.
- T-Nation (2022). Article: The Glute Squeeze Push-Up. URL: https://www.t-nation.com/training/tip-the-glute-squeeze-push-up/ (Reference for core/glute connection) Application: Training cue reinforcement for lumbopelvic stability (core bracing).