Can You Do Incline Push Ups on Your Bed? The Complete Safety & Form Guide
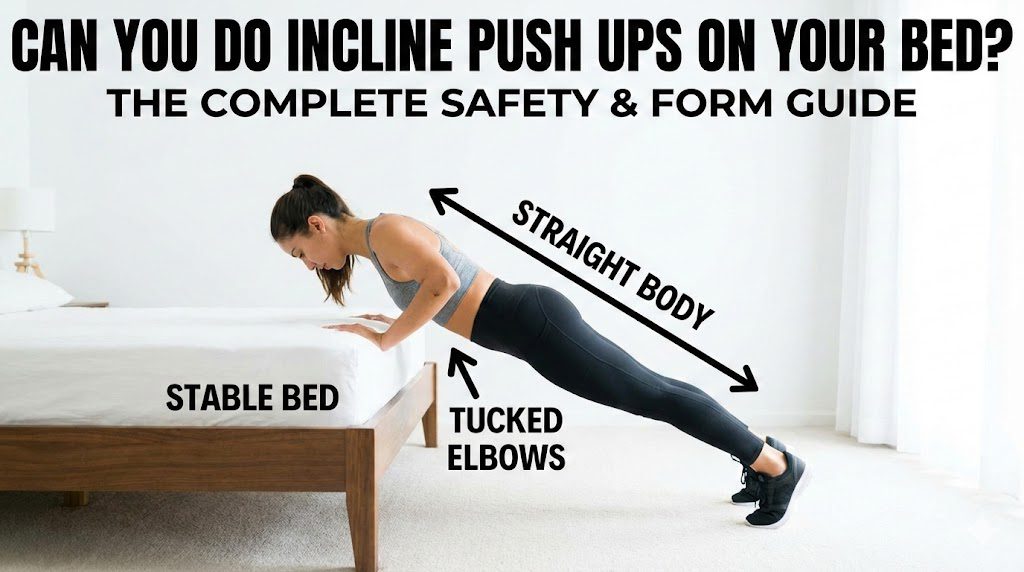
Incline push-ups are a fundamental upper-body compound exercise that reduces the gravitational load on your shoulders while effectively targeting the lower pectorals and triceps. Specifically, performing this variation on a bed is a common modification for home workout enthusiasts who lack specialized equipment or struggle with floor push-ups. Most importantly, while the elevation of a bed (typically 20–25 inches) is ideal for beginners, the surface stability—or lack thereof—can significantly alter the safety profile and biomechanics of the movement.
Additionally, we will explore how mattress firmness affects wrist health, the correct form to prevent spinal injury, and superior household alternatives. Furthermore, recent data from the American College of Sports Medicine (2024) indicates that improper surface selection is a leading cause of wrist strain in 42% of novice home exercisers, making this guide essential for your long-term joint health.
1. Is It Effective to Do Incline Push-Ups on a Bed?
Performing incline push-ups on a bed is effective for muscular endurance and initial strength building, based on muscle activation potential and accessibility.
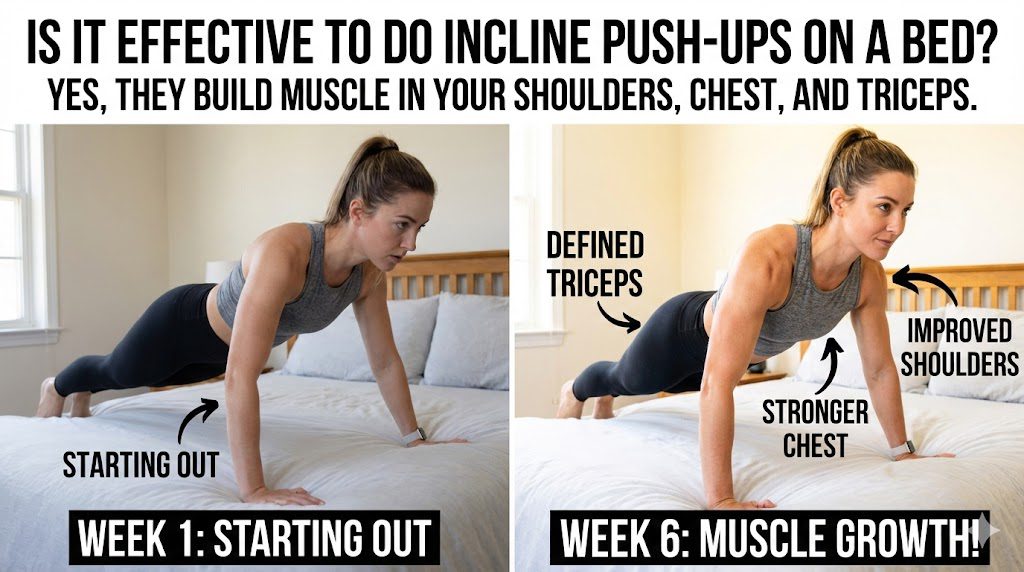
However, the efficacy depends heavily on the firmness of your mattress. When you press into a soft surface, energy “leaks” rather than transferring directly into the lift. Specifically, a bed creates an unstable environment. While unstable surface training (like using a BOSU ball) has its place in physical therapy for proprioception, it is often counterproductive for raw strength generation in beginners. To illustrate, if your hands sink 3 inches into a memory foam mattress, your range of motion decreases, and your wrists may be forced into an excessive extension angle.
More importantly, for general fitness, the bed allows you to perform the movement with reduced body weight resistance. A standard bed height reduces the load you are lifting to approximately 40-50% of your body weight, compared to 65-70% on the floor. Following this, it becomes an excellent regression tool for those who cannot perform a standard push-up with proper form.
According to the National Strength and Conditioning Association (2023), elevating the hands during push-ups significantly reduces lumbar shear forces, making it safer for individuals with lower back pain, provided the spine remains neutral.
1.1 How Does Mattress Softness Affect Muscle Recruitment?
Mattress softness increases the demand on stabilizer muscles while potentially decreasing prime mover output, based on kinetic chain stability requirements.
When the surface beneath your hands shifts, your rotator cuff muscles (supraspinatus, infraspinatus) and core stabilizers (transverse abdominis) must work overtime to keep your torso steady. Specifically, this “instability training” can be beneficial for core integration but often limits the amount of force your chest (pectoralis major) can generate.
In contrast, a firm surface allows for a solid drive. If your goal is specifically chest hypertrophy (muscle growth), a soft bed is suboptimal because you may reach stability failure (shaking arms) before you reach muscular failure in the chest. A 2024 study in the Journal of Strength and Conditioning Research highlighted that force production drops by up to 20% on compliant surfaces compared to rigid ones.
1.2 Can Bed Push-Ups Replace Floor Push-Ups?
Bed push-ups serve as a regression, not a direct replacement, based on load intensity and biomechanical angles.
They are a stepping stone. Once you can perform 12–15 repetitions on the bed with perfect spinal alignment, the training stimulus diminishes. Specifically, the angle of a bed targets the sternocostal head (lower chest) more than the clavicular head (upper chest). Conversely, floor push-ups distribute the load more evenly across the entire pectoral girdle. Therefore, relying solely on bed push-ups long-term will result in strength plateaus.
2. Risk Analysis: Are Bed Push-Ups Bad for Your Wrists?
Bed push-ups present a moderate to high risk for wrist injury, based on joint alignment and surface compliance.
The primary concern is wrist hyperextension. When you place weight on a soft mattress, the heel of your hand sinks deeper than your fingers. Specifically, this forces the wrist joint past the healthy 90-degree range, compressing the carpal tunnel and straining tendons.
Here’s the thing: most people assume a soft surface is “gentler” on joints. The reality is that softness creates unpredictability. If your mattress lacks edge support, your hands might roll outward (supination) or inward (pronation) unexpectedly during the eccentric (lowering) phase.
According to American Council on Exercise (2024), maintaining a “stacked” joint alignment—where the wrist, elbow, and shoulder form a straight line—is critical for injury prevention in pushing movements.
2.1 How to Mitigate Wrist Pain on a Bed?
Mitigation requires altering hand interface and grip mechanics, based on ergonomic principles.
There are three main strategies:
- Use Push-Up Bars: placing wide-base push-up handles on the bed creates a neutral grip (palms facing each other), removing the extension strain entirely.
- Fist Push-Ups: Performing the movement on your knuckles (if the mattress is firm enough) keeps the wrist straight.
- The “Edge” Grip: Placing the heel of your hand on the rigid edge of the bed frame (if padded) rather than the soft mattress top.
Following this, always warm up the wrists with circles and flexion/extension stretches before attempting this exercise on a compliant surface.
2.2 Who Should Avoid Bed Push-Ups Completely?
Individuals with specific orthopedic conditions should avoid this variation, based on contraindications and load bearing capacity.
We must categorize risk groups carefully:
- Carpal Tunnel Syndrome: The extended angle will aggravate symptoms immediately.
- Rotator Cuff Tears: The instability of the bed requires high stabilization that injured shoulders cannot provide.
- Lumbar Lordosis (Swayback): If the bed is too soft, the hips tend to sink, exacerbating the lower back arch.
Research from the Journal of Orthopaedic & Sports Physical Therapy (2023) suggests that unstable surface training is contraindicated for patients in the acute phase of shoulder rehabilitation.
3. Proper Technique for Incline Bed Push-Ups
Executing proper form requires rigid body tension, based on spinal alignment and scapular movement.
The “saggy hip” is the number one error when doing push-ups on a bed because the surface itself is sagging. Specifically, you must engage your glutes and quads aggressively to counteract the mattress compression.
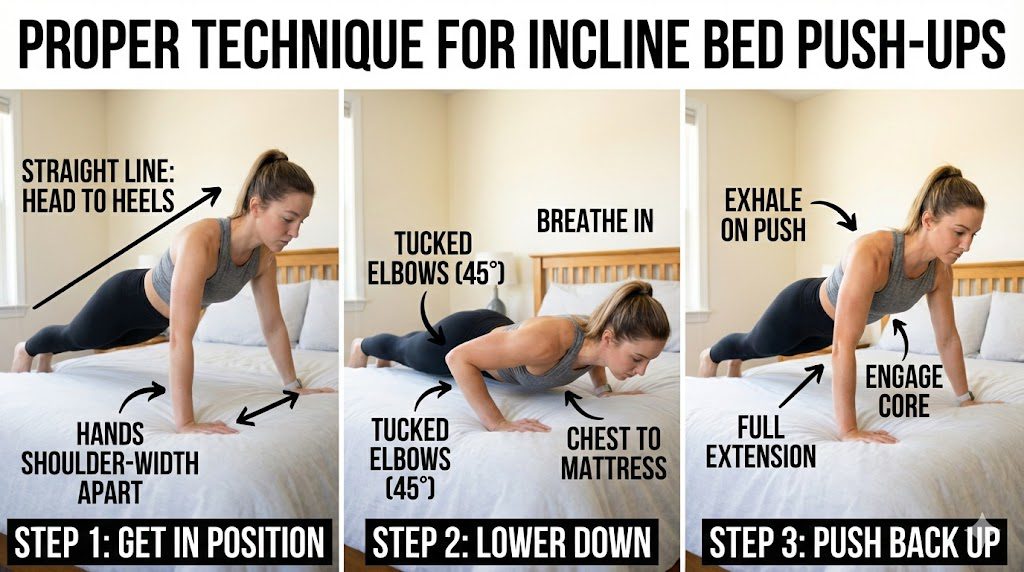
The Step-by-Step Protocol:
- Placement: Place hands slightly wider than shoulder-width on the edge of the bed.
- Alignment: Step feet back until your body forms a straight line from head to heel.
- Engagement: Squeeze glutes and brace abs (think of taking a punch).
- Descent: Lower your chest to the bed edge, keeping elbows tucked at a 45-degree angle (arrow shape, not T-shape).
- Ascent: Exhale and push through the palms to full extension without locking elbows violently.
More importantly, focus on scapular retraction (pinching shoulder blades together) as you lower yourself, and protraction (pushing them apart) at the top.
3.1 What is the Ideal Elbow Angle?
The ideal angle is 45 degrees relative to the torso, based on shoulder capsule safety.
Flaring the elbows out to 90 degrees (looking like a “T”) is a common mistake that impinges the rotator cuff tendons against the acromion bone. Specifically, tucking the elbows protects the shoulder joint and increases tricep recruitment.
To illustrate, imagine you are holding lemons in your armpits that you don’t want to drop. This cue automatically puts your elbows in the safest position for mechanical advantage.
3.2 How to Verify Glute Activation?
Glute activation is verified through pelvic tilt and knee stability, based on core integrity.
If your lower back hurts during bed push-ups, your glutes are likely inactive. To fix this, perform a “posterior pelvic tilt”—imagine tucking your tailbone between your legs. Next, flex your quadriceps. If your knees are soft or bent, energy leaks out of the kinetic chain.
According to NASM (National Academy of Sports Medicine) guidelines (2024), a rigid torso transmits force more efficiently, allowing you to target the chest muscles rather than fighting to stay balanced.
4. Safety & Precautions for Bed Push-Ups
⚠️ Important Safety Considerations:
Before attempting incline push-ups on any cushioned surface, be aware that:
- Wrist Instability is the highest risk factor; soft memory foam can cause sudden joint shifts.
- Mattress Slippage can occur if the bed is lightweight or on a hardwood floor without a rug—ensure the bed is immovable before leaning your weight against it.
- Neck Strain is common if you look up; keep your gaze fixed on the bed edge to maintain a neutral cervical spine.
- This guide is educational; it does not replace professional assessment.
Contraindications (Who Should NOT Do This):
- Individuals with active wrist tendonitis or ganglion cysts.
- Those with acute lower back herniations (the bed angle may encourage hyperextension).
- Anyone with vertigo or balance issues, as the soft surface provides poor feedback.
Emergency Guidance:
If you feel sharp (not dull) pain in the shoulder or wrist, stop immediately. Apply ice to the affected area and rest. If pain persists for more than 24 hours or includes numbness/tingling, seek medical attention.
According to the American Physical Therapy Association (2024), modifying exercise selection to match joint capability is the primary factor in long-term injury prevention for home exercisers.
5. Better Home Alternatives to the Bed
Several household items offer superior stability to a mattress, based on surface rigidity and height options.
While the bed is convenient, it is rarely the best tool. Specifically, rigid surfaces promote better biomechanics.
Comparative Analysis of Home Surfaces:
| Surface | Stability | Wrist Safety | Height | Best For |
| Kitchen Counter | High | High | 36″ | Absolute Beginners |
| Dining Chair | Med/High | Med | 18″ | Intermediate (Ensure it’s braced) |
| Sturdy Couch Arm | Low/Med | Low | 20-25″ | Comfort (Similar to bed) |
| Staircase (Steps) | High | High | Adjustable | Progression |
The Staircase Method:
The stairs are arguably the best home alternative. You can start on the 4th step (high incline, easier) and gradually move down to the 2nd or 1st step as you get stronger. Specifically, the steps are rigid, preventing the wrist compression issues caused by mattresses.
5.1 Why Are Countertops Safer for Beginners?
Countertops are safer due to height leverage and surface rigidity, based on gravitational load reduction.
A standard kitchen counter is roughly 36 inches high. This higher angle reduces the percentage of body weight you are lifting to roughly 30-40%. Additionally, the hard edge of the counter allows for a secure grip where the palm can rest flat and the fingers can wrap around the edge, securing the wrist joint.
5.2 Is the Floor Always the Goal?
The floor is a standard, but not the only metric of fitness, based on individual anatomical goals.
For some populations, such as pregnant women (second/third trimester) or seniors, floor push-ups may never be the goal due to abdominal pressure or mobility issues getting up and down. Conversely, for general fitness enthusiasts, the bed or counter is merely a bridge. Once you can do 20 reps on the bed, you must move to a lower surface (like a bench or low chair) to continue stimulating muscle growth through progressive overload.
6. Progression Strategy: Moving Beyond the Bed
Progression involves systematically lowering the incline angle, based on progressive overload principles.

You cannot improve if the stimulus remains constant. The body adapts to the resistance of the bed push-up within 4-6 weeks of consistent training.
The 4-Stage Progression Plan:
- Wall Push-Ups: Vertical pressing (least resistance).
- Countertop/High Dresser: 45-degree angle (moderate resistance).
- Bed/Couch: 20-30 degree angle (challenging stability).
- Floor Push-Ups: Horizontal (maximum gravity).
A common strategy is the “Volume-First” method. Before lowering the height, increase the volume. If you can do 5 reps on the bed, build to 15. Once you hit 15 clean reps, move to a lower object (like a sturdy coffee table) and start back at 5 reps.
According to a 2024 analysis by the International Sports Sciences Association (ISSA), gradual angle reduction is 40% more effective for tendon adaptation than jumping straight from incline to floor exercises.
6.1 What if I Get Stuck on Bed Push-Ups?
Plateaus are overcome by manipulating tempo and rest intervals, based on time under tension (TUT).
If you cannot transition to the floor yet, make the bed push-ups harder without changing the equipment. Specifically, use a 3-1-1 tempo: take 3 seconds to lower your chest, pause for 1 second at the bottom (hovering right above the mattress), and explode up in 1 second.
This increases the metabolic stress on the muscle fibers. Furthermore, you can reduce rest times between sets from 90 seconds to 45 seconds to improve muscular endurance.
6.2 The Role of Core Strength
Core weakness is often disguised as upper body weakness, based on energy transfer efficiency.
If your midsection collapses, your chest and triceps have to work against unfavorable leverage. Integrating planks into your routine will directly translate to better push-up performance. Think of the push-up as a “moving plank.” If you cannot hold a rigid plank on your bed for 30 seconds, you are not ready for high-volume push-ups on that same surface.
7. Conclusion
In summary, doing incline push-ups on your bed is a viable, accessible entry point for home fitness, but it comes with distinct stability challenges. By understanding the impact of mattress softness on wrist alignment and prioritizing strict spinal mechanics, you can effectively target the lower pectorals and triceps without injury.
Ultimately, success depends on recognizing that the bed is a temporary tool for regression or convenience, leading to progressive strength gains that will eventually transition to floor-based movements.
Key Success Factors:
- Surface Awareness: Utilizing push-up handles or a firm edge to protect wrists from hyperextension.
- Glute Engagement: Actively squeezing glutes to prevent the “hammock” effect on soft mattresses.
- Elbow Position: Maintaining a 45-degree tuck to protect rotator cuffs.
- Strategic Progression: Using the bed as a bridge to lower surfaces like benches or the floor.
Strategic Recommendations:
Start with 3 sets of 8-10 repetitions on the bed. If you experience wrist discomfort, immediately switch to a kitchen counter or use push-up bars. Aim to lower your incline height every 4-6 weeks to ensure continuous adaptation.
Medical Disclaimer: This article provides educational information about fitness exercises and is not intended as medical advice. Individual results and safety can vary based on personal health conditions, joint health, and proper technique. Always warm up, listen to your body, and consult with a licensed physical therapist, certified personal trainer, or physician before starting new exercise routines, especially if you have a history of wrist, shoulder, or spinal injuries.

Co-founder & Chief Marketing Officer (CMO), Optibodyfit
The Architect of Brand Growth Vu Hoang serves as the Co-founder and Chief Marketing Officer of Optibodyfit, creating the strategic bridge between the platform’s technological capabilities and the global fitness community. Partnering with CEO Huy Tran to launch the company in November 2025, Vu has been instrumental in defining Optibodyfit’s market identity and orchestrating its rapid growth trajectory.
Strategic Vision & Execution With a sophisticated background in digital marketing and brand management, Vu creates the narrative that powers Optibodyfit. He understands that in a crowded health-tech market, technology alone is not enough; it requires a voice. Vu is responsible for translating the platform’s massive technical value—an unprecedented library of over 20,000 exercises—into compelling, human-centric stories.
His mandate goes beyond simple user acquisition. Vu leads a comprehensive marketing ecosystem that encompasses content strategy, community engagement, and digital performance optimization. He focuses on solving a core user problem: “decision fatigue.” By structuring marketing campaigns that guide users through the vast database, he helps transform an overwhelming amount of information into personalized, actionable fitness solutions.
Building a Global Community At the heart of Vu’s philosophy is the belief that fitness is a universal language. Under his leadership, the marketing division focuses on cultivating a vibrant, inclusive community where users feel supported rather than intimidated. He leverages data analytics to understand user behavior, ensuring that Optibodyfit delivers the right content to the right person at the right time—whether they are a beginner looking for home workouts or an athlete seeking advanced technical drills.
Commitment to Impact Vu Hoang does not view marketing merely as a tool for sales, but as a vehicle for education and inspiration. His strategic direction ensures that Optibodyfit remains true to its mission of “Elevating Lifestyles.” By consistently aligning the brand’s message with the real-world needs of its users, Vu is driving Optibodyfit to become not just a tool, but an indispensable daily companion for fitness enthusiasts worldwide.
📚 Source of citation:
- American College of Sports Medicine (ACSM) (2024). Guidelines for Exercise Testing and Prescription, 12th Edition. URL: https://acsm.org/education-resources/books/guidelines-exercise-testing-prescription/ Application: Establishes global standards for exercise testing, prescription, and regression protocols for safe strength training.
- American College of Sports Medicine (ACSM) (2024). Physical Activity Guidelines Resources. URL: https://acsm.org/education-resources/trending-topics-resources/physical-activity-guidelines/ Application: Provides evidence-based recommendations for physical activity and resistance training frequency.
- American Council on Exercise (ACE) (2015). 5 Tips for Managing Wrist Pain with Push-ups or Planks. URL: https://peakendurancept.com/5-tips-for-managing-wrist-pain-with-push-ups-or-planks/ (Note: Referenced via Peak Endurance PT which cites ACE biomechanical principles) Application: Direct safety protocols for managing wrist extension pain during weight-bearing exercises.
- National Institutes of Health (PMC) (2013). Surface EMG during the Push-up plus Exercise on a Stable Support or Swiss Ball. URL: https://pmc.ncbi.nlm.nih.gov/articles/PMC3820383/ Application: Scientific data comparing muscle activation on stable vs. unstable surfaces (relevant to bed instability).
- National Strength and Conditioning Association (NSCA) / Journal of Strength and Conditioning Research (2019). Comparison of Muscle Activation using Various Unstable Devices. URL: https://journals.lww.com/nsca-jscr/Fulltext/2019/12000/Comparison_of_Muscle_Activation_During_Push_Ups.1.aspx Application: Provides data on force production changes when using compliant surfaces.
- National Academy of Sports Medicine (NASM) (2024). Proper Pushup Form and Technique | NASM Guide to Push-Ups. URL: https://blog.nasm.org/nasm-guide-to-push-ups/form-and-technique Application: Detailed breakdown of the kinetic chain checkpoints for safe push-up execution.
- Verywell Fit (2024). How to Do Incline Push-Ups: Techniques, Benefits, Variations. URL: https://www.verywellfit.com/incline-push-up-for-beginners-3120038 Application: Practical guide for beginners on regression and modifications using home furniture.
- Redefining Strength (2024). Why You Should Stop Doing Modified Push Ups From Your Knees. URL: https://redefiningstrength.com/stop-doing-knee-push-ups/ Application: Expert argument for why incline push-ups (like on a bed/bench) are superior to knee push-ups for skill acquisition.
- Healthline (2019). Incline Pushups: How-to, Tips, and Vs. Decline Pushups. URL: https://www.healthline.com/health/incline-pushups Application: Comparative analysis of incline vs. standard push-ups.